

X's and O's are my favorite part of Valentine's day!! (Yes, I know it is past Valentine's day, but I figured we can celebrate love for a whole month :) When I was a kid, my Grandparents used to send me presents with XOXO written on the card or in the front of the book. Those far away hugs and kisses have always meant so much to me. So around this time of year, I always have a desire to figure out some design that I can tie X and O into :) This years happened to be a twist on a basic lattice quilt.

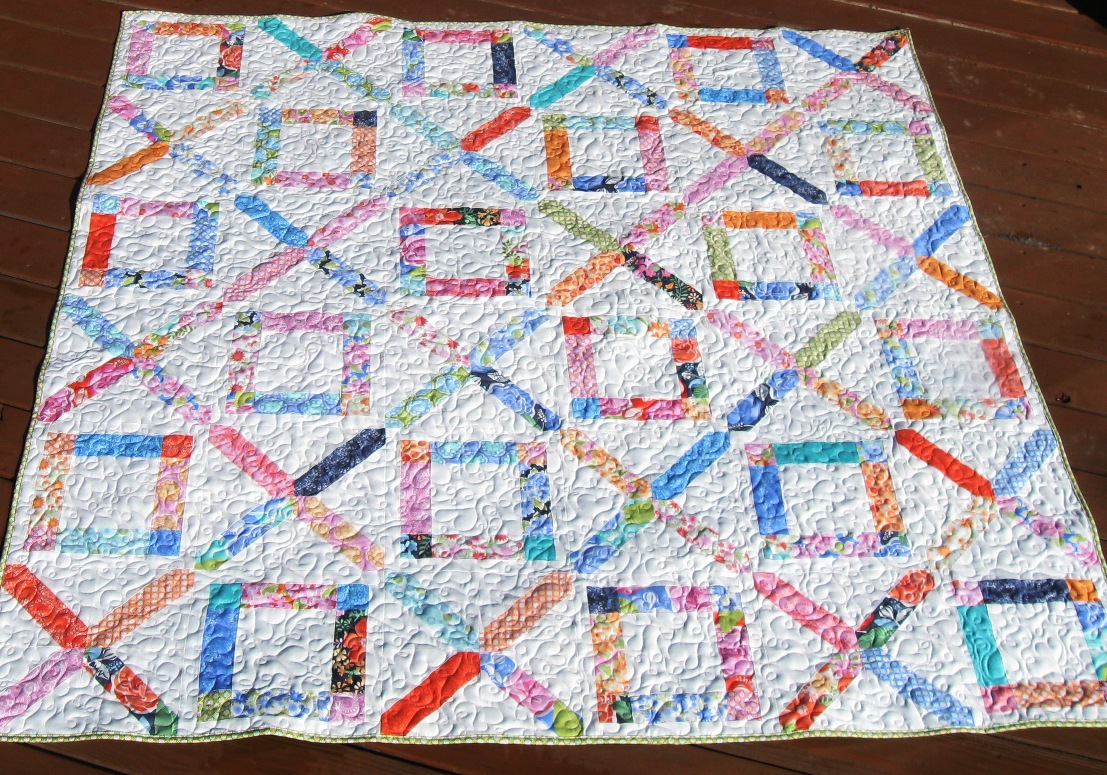
The quilt measures 72" x 72", just the perfect size for you and someone special to snuggle up in :) It is made using a Honey Honey by Kate Spain jelly roll and some Bella Solid. It really is a fun quilt to put together and is very beginner friendly. Don't you just love how those lattice strips blend together framing out the O's :) So fun!!!

And now that this
Moda Bake Shop Tutorial has been published for a while, I can now post it here
on my blog for your convenience ;) So just follow along
below for the full step-by-step tutorial. And if you love it, you can get
the printer friendly version here :)

1 Honey Honey Jelly Roll
3 1/4 Yards of Bella Solid White
3 1/4 Yards of Bella Solid White
3/4 Yard for Binding
5 Yards for Backing
5 Yards for Backing


STEP 1 – CUTTING
Choose 36 jelly roll strips from your bundle. (I set aside 4 of the double prints) Lay them out as follow, keeping them folded in half. You can cut about 6 rows at a time. Using the lines on your mat as a guide, cut a sliver off the end to remove the fold. Then cut a 2 1/2″ x 10 1/2″ rectangle, a 2 1/2″ x 6 1/2″ rectangle, and a 2 1/2″ x 2 1/2″ square. Place the remaining bit in scrap. You will have 2 of each cut. Repeat with all 36 strips to have a total of (72) 2 1/2″ x 10 1/2″ rectangles, (72) 2 1/2″ x 6 1/2″ rectangles, and (72) 2 1/2″ x 2 1/2″ squares.
Choose 36 jelly roll strips from your bundle. (I set aside 4 of the double prints) Lay them out as follow, keeping them folded in half. You can cut about 6 rows at a time. Using the lines on your mat as a guide, cut a sliver off the end to remove the fold. Then cut a 2 1/2″ x 10 1/2″ rectangle, a 2 1/2″ x 6 1/2″ rectangle, and a 2 1/2″ x 2 1/2″ square. Place the remaining bit in scrap. You will have 2 of each cut. Repeat with all 36 strips to have a total of (72) 2 1/2″ x 10 1/2″ rectangles, (72) 2 1/2″ x 6 1/2″ rectangles, and (72) 2 1/2″ x 2 1/2″ squares.

Now from your white yardage cut the following.

Separate your cut pieces into 2 groups as follows. The first grouping will be used to create the O blocks and the second grouping will be used to create the X Blocks.

STEP 2 – O BLOCKS
We’ll start by making the O blocks. Gather a 6 1/2″ square and (2) 6 1/2″ print strips and lay out as shown below. Place the strips onto the square with right sides together. Sew a 1/4″ along the edges, aligning as you sew. Press towards the center square. Repeat to make 18 center units total. (Chain stitching saves time)
We’ll start by making the O blocks. Gather a 6 1/2″ square and (2) 6 1/2″ print strips and lay out as shown below. Place the strips onto the square with right sides together. Sew a 1/4″ along the edges, aligning as you sew. Press towards the center square. Repeat to make 18 center units total. (Chain stitching saves time)

Gather a 6 1/2″ strip and (2) 2 1/2″ squares and lay out as shown below. Place the squares onto the strip with right sides together. Sew a 1/4″ along the edges, aligning as you sew. Press towards the squares. Repeat to make 36 top and bottom units total. (Chain stitching will save lots of time :)

Lay (2) top and bottom units and one center unit out as follows.

Lay the top and bottom units onto the center with right sides together. Nest the seams and pin. Sew a 1/4″ seam along the pinned edge. Press. And now, you just have to add the sashing border. Gather (2) 10 1/2″ white strips and (2) 12 1/2″ print strips and layout as shown. Lay the top and bottom border onto the O with right sides together. Sew a 1/4″ seam aligning as you go and press. Repeat for the two side borders.

And the O Block is finished measuring 12 1/2″ x 12 1/2″. Repeat the last 2 sub-steps to make a total of 18 O Blocks.

STEP 3 – X BLOCKS
Gather a 10 1/2″ strip and 2 subcut white triangles and lay them out as shown. Place the right hand square onto the strip with right sides together centering the triangle. Sew a 1/4″ seam along the edge, aligning as you go. Open and finger press the triangle. Lay the second triangle onto the left hand side of the strip with right sides together and lining the tips of the triangles up. Sew a 1/4″ seam along the edge, aligning as you go. Press towards the triangles. Repeat to make 72 lattice units. (Chain stitching will save lots of time here)

Print of the Squaring Up guide that is attached at the end of this post. Lay any square ruler onto the guide. (It is okay if your ruler is larger than the guide, it just means you will have to turn it while trimming. If you have a 6 1/2″ square ruler it will save time :)

Using masking tape, mark the edges of the diagonal lines creating a guide on your ruler for squaring up your units.

Place your marked ruler onto your unit, aligning the lines of the seams with the edges of the masking tape. Trim the excess along the edge of your ruler. If your ruler is larger, trim 2 sides, then spin your unit, realign and trim the remaining 2 sides.
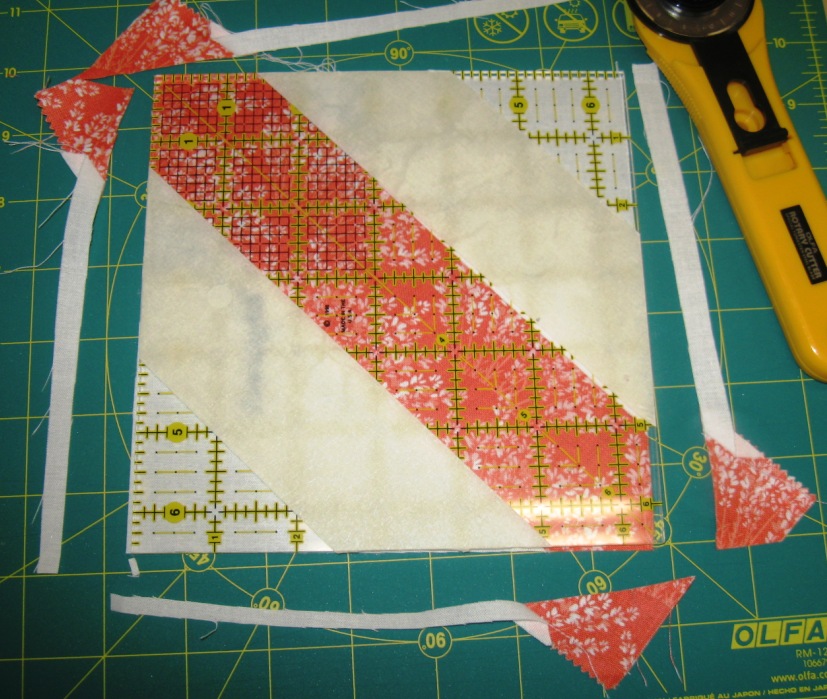
And you have a perfect lattice unit that measures 6 1/2″ x 6 1/2″. Repeat for all 72 lattice units.

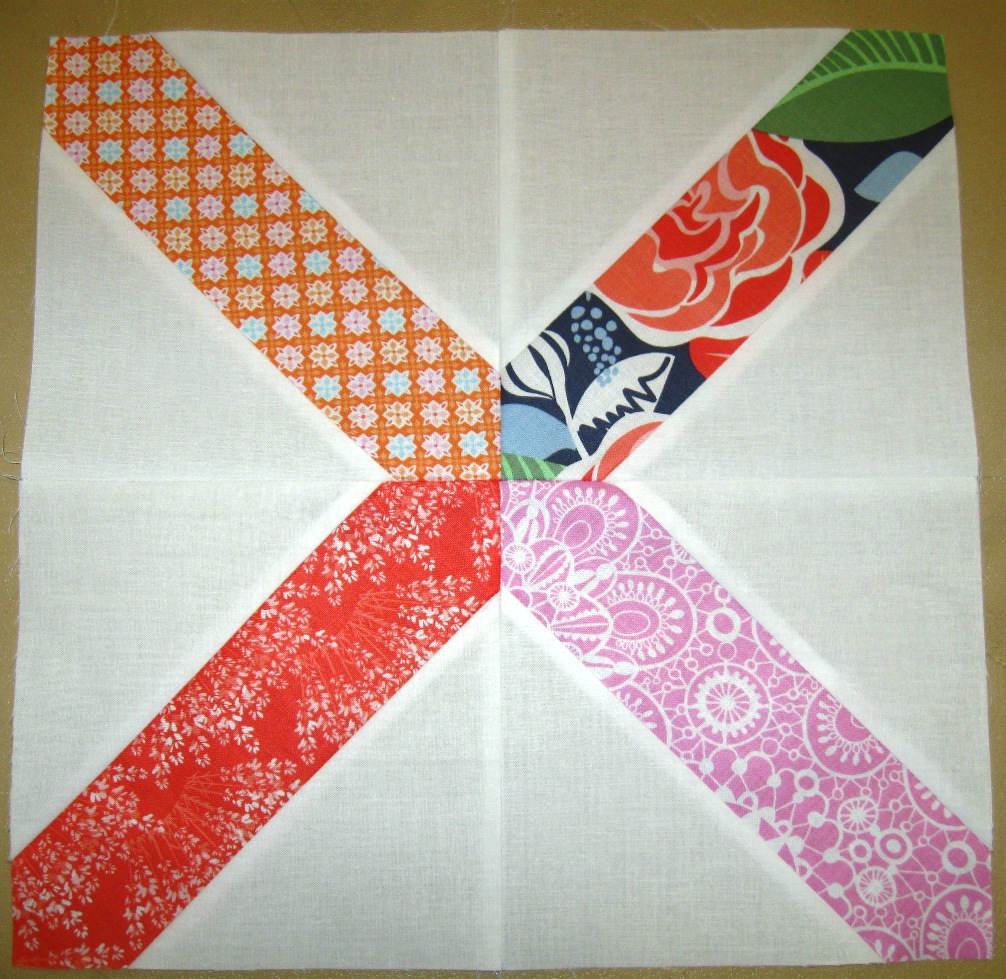
Lay 4 lattice units out as shown. Lay the right hand side units onto the left hand sides with right sides together. Align the diagonal seams and pin. Sew a 1/4″ seam along the pinned edge and then press seams open. Lay the top row onto the bottom row with right sides together. Align the diagonal seams as well as the center seam and pin. Sew a 1/4″ seam along the pinned edge and press the seam open.

And the X Block is finished measuring 12 1/2″ x 12 1/2″. Repeat the last step to make a total of 18 O Blocks.
STEP 4- SEWING THE QUILT TOP
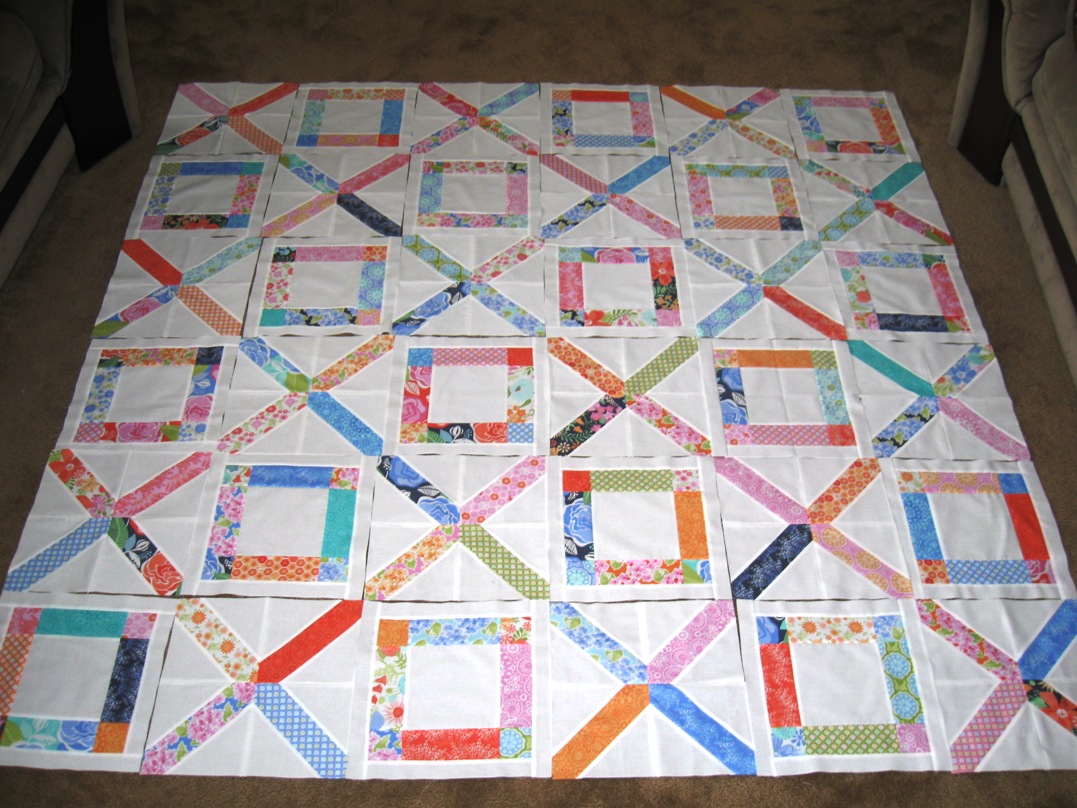
Lay the X and O blocks alternating into 6 rows of 6. Play with the layout until you get a look that is please to the eye. I tried to separate the red and navy units most as they tend to pop. Once you have a please layout you are ready to sew the blocks into row.
Lay the X and O blocks alternating into 6 rows of 6. Play with the layout until you get a look that is please to the eye. I tried to separate the red and navy units most as they tend to pop. Once you have a please layout you are ready to sew the blocks into row.
I find the easiest way to do this is to stack each row and place some sort of marker on the first block indicating what row it is. This way you don’t lose the layout you just did.
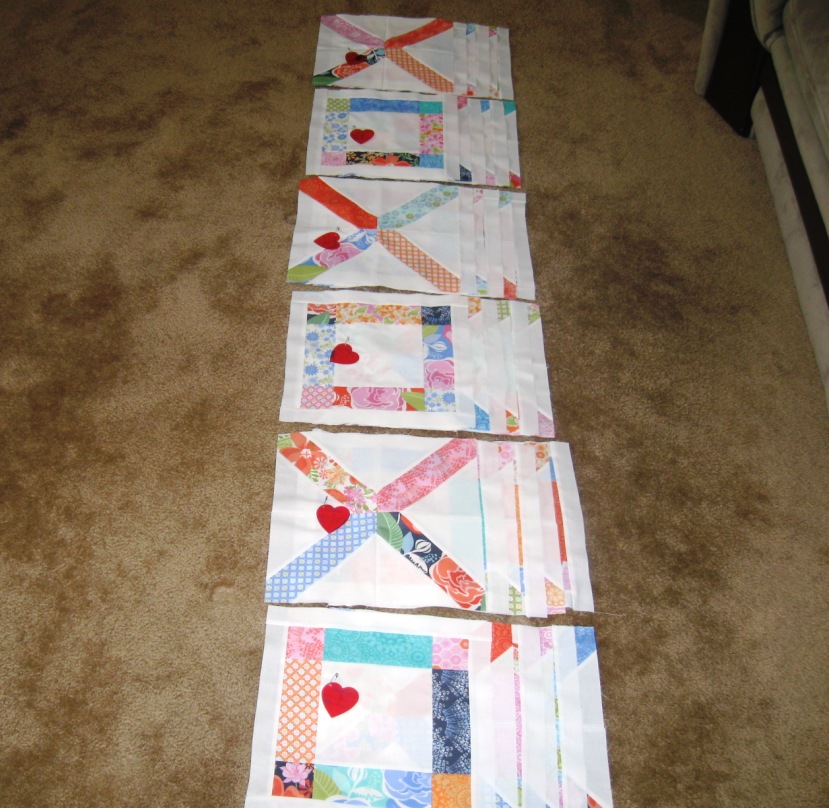
Then just start sewing the blocks together, one block adding to the next, and the next until you have sewn all 6 in the row. Then just repeat for all 6 rows. I do not pin my blocks when sewing them into row as there are no seams to line up. I just align as I go.

Press your seams in the rows towards the O blocks. This will allow you to nest the seam and avoids bulk around the X corners.

Sewing the rows together is just like creating them. Lay the first row onto the second with right sides together. Nest the seams and pin them and then along the rest of the edge. Sew a 1/4″ seam along the pinned edge. Press open. Then repeat adding the third row to the now sewn together first and second row and so on.

And before you know it, you have a beautiful Hugs before Kisses Quilt Top!!

STEP 5- FINISHING THE QUILT
So now it is time
to turn that finished quilt top into a finished Quilt ;) Time to
Baste It, Quilt It, and Bind It!!! Which is a whole lot in one
little sentence. If you are new to quilting, you can see my Finishing Your Quilt Series of video tutorials that will walk you through Basting,
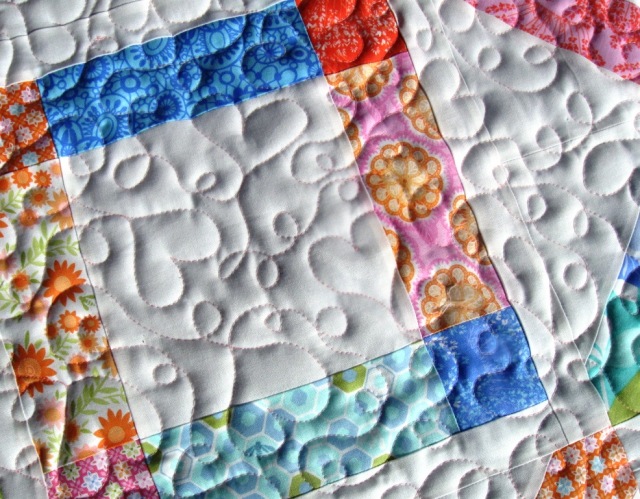
Quilting, and Binding step by step ;) I choose to quilt mine in an all-over free motion design of traveling loops and hearts to fit the Valentines theme. There is also a video tutorial of how to do this on the Video Tutorial Tab of my blog, Just look down the page a bit 


One adorable Hugs before Kisses quilt measuring 72″ x 72″ perfect for snuggling under.

I hope you have
enjoyed this tutorial and if you make your own Hugs Before Kisses Quilt I would love to see
it!! You can email me a picture at happyquiltingmelissa@gmail.com,
post it to social media with #happyquiltingwithmc or or add it to
my flickr group here ;) I can't wait to see your Hugs Before Kisses Quilts!!!
Have a Happy Quilting Day!!


It's beautiful Melissa! Thanks for a great tutorial...I actually have a jelly roll. I haven't decided how to use it, but this is definitely a great idea.
ReplyDeleteI love it.It`s just wonderful.Thanks for the tutorial!
ReplyDeleteWow you are one clever lady! I can see that this would look great made using scraps too.
ReplyDeleteGreat design Melissa. Thanks for sharing the tutorial.
ReplyDeleteA beautiful quilt Melissa. i love the quilting
ReplyDeleteVery nice, and the quilting is just right for it! Very pretty fabrics too!
ReplyDeleteThis is so pretty! Lovely design...
ReplyDeleteLove this one, Melissa! Definitely going to make this! Thank you for the FANTASTIC tutorial at the MBS!
ReplyDeleteI like this quilt Melissa and I will make it too. It is wonderful that you are so talented and that you share your patterns with us. Your quilt is very pretty and you are very special. Thank you for all the great things you do.
ReplyDeleteyou quilt came out so beautiful and I love the quilting with the hearts on it. I am very poor quilter and wish I could do half as nice as that! thank you for sharing this and I love your blog.
ReplyDeleteFun name and effect :o)
ReplyDeleteBeautiful quilt and quilting! It is so pretty, fresh and clean looking! Will be a fun quilt to use and enjoy!
ReplyDeleteWhat a gorgeous quilt! I just love the hearts in your quilting!
ReplyDeleteGorgeous quilt Melissa! .......I couldn't see the the squaring up print out at the end of the post? Or recipe printout? Am I going blind?
ReplyDeleteRebecca.bird@clear.net.nz
It's so beautiful Melssa!
ReplyDeleteWhat a sweet quilt! And lovely free motion quilting, too.
ReplyDeleteYes, I love it!! I have always been a very traditional quilter but lately I am becoming a lover of modern quilts. They are so clean and crisp looking and that's what I thought when I looked at this quilts. Very nice..
ReplyDeleteI love it, so much and have a jelly roll, I love everything you make.. your very inspiring and I am so one day soon, get my Starburst QAL done. I had family pop in early, which they are always welcomed but 3 kids keep you from sewing.. thank you
ReplyDeleteI just popped into Moda Bake Shop and found this new quilt pattern of yours! Another beauty! I love jelly rolls and have a few, so I'm going to bookmark this one! Thanks so much!
ReplyDeleteMGM
really love the quilt! great fresh colors.
ReplyDelete