
I am so excited to get to be part of the Sew Red for Women Blog Hop. Leah from Burgundy Buttons organized this amazing hop (and blog) to draw attention to Heart Disease. This cause is close to Leah's heart and she is doing a phenomenal job raising awareness. Check out the Sew Red for Women blog to learn more about what you can do to help prevent Heart Disease.

So now it's my turn to Sew Red for Women!! So let's get started on the tutorial!!

To start you will need the following squares of fabric:
(8) 3 1/2" x 3 1/2" pink squares
(8) 3 1/2" x 3 1/2" white squares
(32) 2" x 2" assorted red/pink print squares

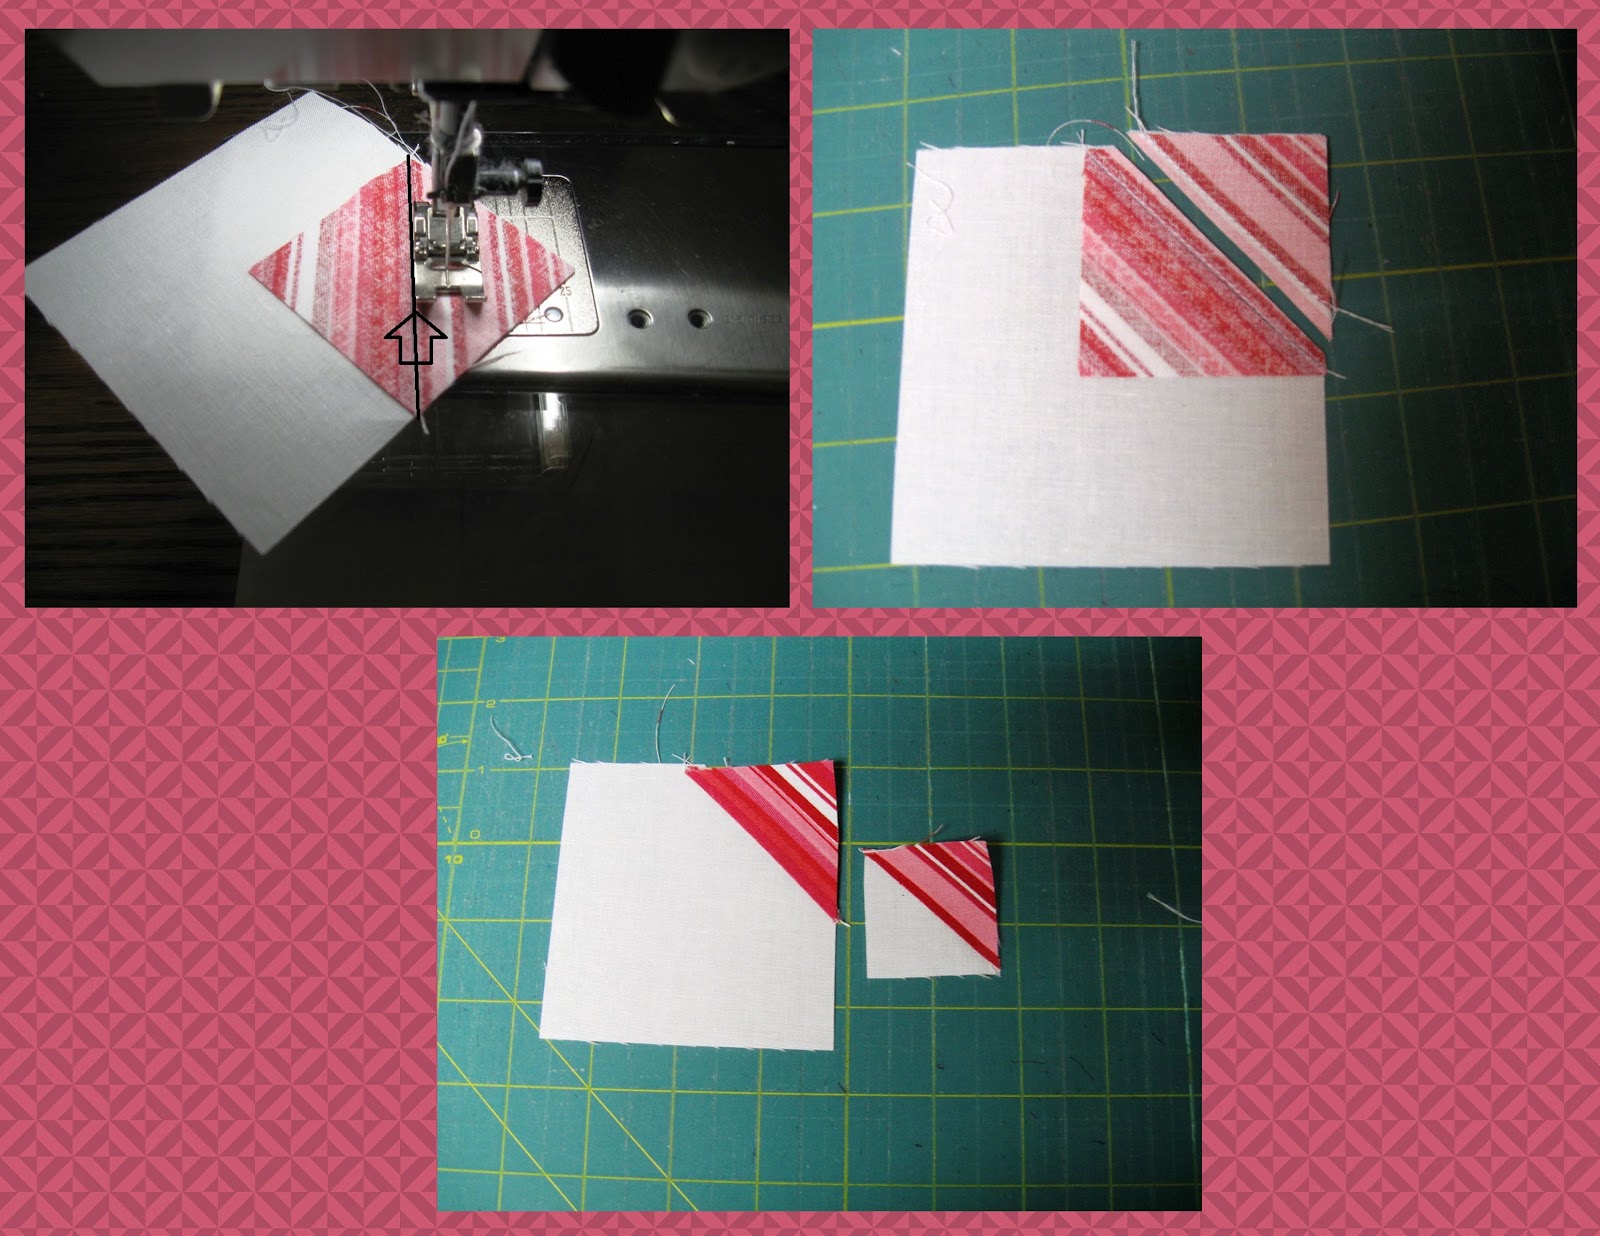
Start by drawing a diagonal line across the wrong side of all of your 2" squares. Then line up your 2" square in the upper right hand corner of your 3 1/2" square. Sew diagonally across your 2" square directly on the drawn line. Continue to chain stitch all of your 16 blocks.

Clip the threads between your squares. Align your ruler 1/4 over the sewn line then trim away the excess. Press towards the print fabric.

So now you are here and ready to finish the other side. Once again line up your 2" square but this time in the upper left hand corner of your 3 1/2" square. Sew diagonally across your 2" square directly on the drawn line. Continue to chain stitch all of your 16 blocks. Clip your threads , trim, and press.

Optional Side Note***If you don't like to waste any fabric, you can always make some super fun tiny half square triangles by sewing 1/2" away from the already sewn line. I use the edge of my presser foot as a guide and move over my needle to do this. Once again, just chain stitch all of your squares. Then trim down between your 2 sewn lines. Then press open. Yippee Skippee for baby HST's :)
So now with your squares all cornered up, go ahead and lay them out as follows.

Now you are going to sew your blocks into rows. Just lay the second block over onto your first block. Sew your seam making sure to sew across the center of the X made by your diagonal seams. This will give you prefect points!! Keep adding on blocks until you have sewn your entire row. Repeat for the other 3 rows. Press your first and third rows to the left and your second and fourth row to the right. (this will allow your to nest your seams :)
With your rows sewn together you can now sew your rows into a block. Take care to nest your seams and pin each one so you get nice points. Press your rows open to avoid bulk.

And your done!!! I hope your enjoy this block and have fun putting it together :)

And after you are done making your own version of Block 4 be sure to add it to the Sew Red for Women Flickr Group
And if you are just joining the Hop here is a schedule of where it has been and where it is going :) Yippee Skippee for being part of such an amazing group of quilters!!!
And if you are just joining the Hop here is a schedule of where it has been and where it is going :) Yippee Skippee for being part of such an amazing group of quilters!!!
February 3
Leah of Burgundy Buttons
Leah of Burgundy Buttons
March 3
Fat Quarterly's Tacha of Hanies Quilts
Fat Quarterly's Tacha of Hanies Quilts
April 3
Katie of Swim, Bike, Quilt
Katie of Swim, Bike, Quilt
May 3
You are Here!! Melissa of Happy Quilting
You are Here!! Melissa of Happy Quilting
June 3
Charlie of Qubee Quilts
Charlie of Qubee Quilts
July 3
Jessica of Twin Fibers
Jessica of Twin Fibers
August 3
Melissa of The Polkadot Chair
Melissa of The Polkadot Chair
September 3
Amber of A Little Bit Biased
October 3
Amy of Diary of a Quilter
Amber of A Little Bit Biased
October 3
Amy of Diary of a Quilter
November 3
Amy of Amy's Creative Side
December 3Amy of Amy's Creative Side
Sherri of A Quilting Life
January 3
Fat Quarterly's Lynne of Lily's Quilts

So what have you been up to??? You know what to do :)
TNT Thursday
New to TNT . . . Check out the deets here :)
Please remember to link back to this post and to leave some comment love for your fellow linkers :)
| | | | |
| | | | |
| |


(Cannot add links: Registration/trial expired)


Great tutorial!!! That is a lovely block!
ReplyDeleteGreat tute! This is such a worthy cause too. Thanks!
ReplyDeleteI just came across the Sew Red for Women blog tour & getting caught up on everyone's blocks! I'm a follower but I guess I missed this post! Glad I'm seeing it now! It's fantastic!
ReplyDelete